
In the 3rd game of the GS Caltex Cup held on Monday, Kim Jisuk won Lee Sedol by resign.
And hence he claimed the title by winning the legendary Lee Sedol 3-0.
Nobody could stop Dynamite aka Crown Prince Kim Jisuk from claiming the world champion.
Even the Korea No. 1 Crazy Stone aka Lee Sedol.
This is actually the first time Lee Sedol to 0-3 to someone in a 5 game match.
However, he lost 0-2 to Park Junghuan just recently, so people were speculating that he would lose to Kim Jisuk in this championship.
We just didn't expect it to be a clean 3-0 for Kim Jisuk.
The third game was also very complicated, and in fact out of the 3 games, it was the game in which Lee Sedol had the most chance.
Let's take a look at how the 3rd game was like:
(Skip the game and go to conclusion)

The game until here was quite "normal". No new josekis, no new variations this time. I wonder if this is because in the first two games Lee Sedol's new josekis were not very successful so he didn't dare to use them in this game, or he thinks that he has a higher chance of winning this way. Whichever it is, when white played 28, this game was going in a very simple direction. Black attacks, white defends. Black needs to gain profit through attacking, while white needs to live the group while not letting black getting too much profit at the same time.

Black had a few choices but in the real game black chose to go for the cap at 29. White 30 is not really a common move in this case. Usually white would go for moves like A so as to make eye shape while not making the group too heavy at the same time. Black 31 is a very severe move, and is also a must to prevent while from making living on top. White 34 was what Lee Sedol was aiming for. He thinks that those few black stones there are not strong enough. Instead of defending, he counter-attacks black's stones instead. A very Lee Sedol way of thinking.

Black 35 and 37 is a common tesuji. Up to 40 black strengthend itself in sente, but paid the price of losing the top left territory. Black 41 could also have chosen to play at A, but it would become a ko and maybe Kim Jisuk didn't have the confidence to fight the ko. Black 41 is also a severe move and now white needs to run out.

White 44 is the only way out for white. White exchanged 46 and 48 first to emphasize that black also has weakness. However black continued to play strongly at 45 and 51, and Lee Sedol thought for very long here. White 52 is a good move, but black 57 was also very painful for white.
 |
Playing directly at 52 is also possible, but Lee Sedol probably didn't feel good about the cutting aji at 53. |
 |
| If white plays at 58 this way then when black cuts at 59 white needs to play another move at A to defend. |
 |
| 72 = A |
 |
| 82 = 88, 85 = A |
White 86, Black 89 are all very good ko threats. White 90 is actually a very ambiguous place.
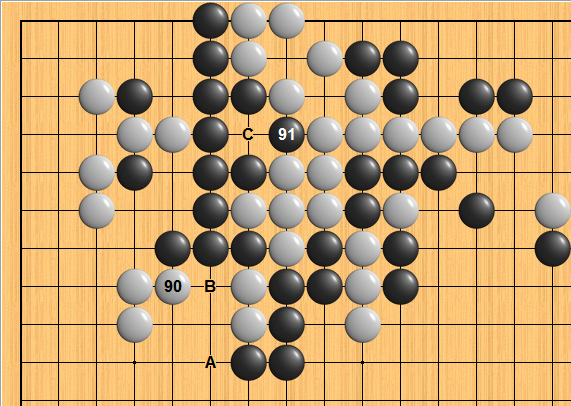 |
| White 90 could also have chosen to play here. This would also reduce Black's liberty by one. When takes at 91, if white continues to fill black's liberties at B, black would connect at C and white loses by 1 liberty. But white can continue to fight the ko and black also would not dare to use the ko threat at A because it would further decrease black's liberties. Maybe playing here would have been better. |
 |
| 91, 97, 103, 109 = 114 94, 100, 106 = 112 |
From the actual game, it can be seen that Lee Sedol didn't have the intention to go for a capturing race at all. He was bent on winning the ko.
The long ko fight finally ended at 114. Even though white had a lot of ko threats in the centre, black also had a lot on top left corner. When black played at 95, white wasn't happy with the exchange where black live in the corner and white live on top, so white continued to fight the ko, ending up in blacking having more ko threats. When black played at 113, white could not answer it anymore.
 |
| If white answers at 114, black would have many more ko threats around the A area, and even B is also a ko threat. It would be impossible for white to win this ko. |

White plays 116 and starts another fight in the centre. From black 117 to white 124 they look like amateur moves and a bit funny. But in actual fact both sides didn't have much of a choice here. Black needed to get sente to play the big move at 125, but the price was the huge white wall in the centre plus the moyo in the bottom left. At this moment the commentator said: "If the whole bottom left belongs to white, this game is already over."
 |
| Because the top left is still a ko, normally black should play a move there to get rid of the ko. However white 126 is a super big move, and it is also most likely sente because white can take the stone at A to threaten the whole black group next. So black had no choice but to play at 126 and fight the ko on the top left. |
 |
| 131 = 135 132 = A |
 |
| If white answers at 134, after black wins the ko black can play the endgame move at A, so white will lose more territory this way. No matter how exciting the game is, always remember to protect your territory, because ultimately that's what will decide the game. |
 |
| 144 = 149 |
Black takes the ko and makes the top left group live, while white runs out the stones by playing at 138. White is not only trying to make the stones but he is also trying to attack the whole group of black stones in the centre. Remember white still has a huge moyo on the bottom left. If white manages to successfully live on the right side and play another move on the left side, it would be game over for black. Hence at this point the game looked better for white. However this whole white group was actually more dangerous than expected, especially after black's strong move at 161.
 |
| The reason white played at A instead of here in the actual game is to prevent black from making an eye in sente like this. With an eye it would be easier for black to fight. Also, in this diagram white also loses its eyes. With a stone at A, at least white still has half an eye at 158, plus white can destroy black's eye in sente like in actual game. |

White 162 is a tesuji. Black played 165 to detroy white's eye, and black had to defend at 167 because black has a cut at A. White 168 is a good move. Until 173, now it became a huge fight that involves the right black group and the top right white group as well.
 |
| 179 = 184 |
 |
| White could actually live by playing this way. But probably he was not happy with this result because the top right died and black gets sente to play on the bottom left white moyo. |
 |
| If black tries to kill by playing at 179, white will connect the ko at 180. Even though black can kill the top right white stones, white gets an eye in sente at 186 and lives at 192. |
 |
| If black 183 plays here, white will connect the ko at 184. This time white will be able to live the whole group in sente, and plays another move to defend the bottom left moyo. Just like the commentator said, the game is practically over if the whole bottom left belongs to white. So this is a no no for black. |
 |
| 185 = 191 188 = A 189 = B |
 |
| 197, 201 = A 200 = 202 White 192 cannot connect here, because black would also connect the ko and the right side would end up in a seki, which also means that the whole white group is dead. Even though white still gets sente, dying a whole group is never a glorious thing. |

At this point the game was definitely better for white. White just needs to gain profit through attacking this group.
White 196 was probably not a very good move. Black 197 is a common tesuji. And black 205, 207 cut was a very strong move. The centre black stones are dead, but because black still has 4 liberties black still can make use of them. Up to 209, black is almost alive. But Lee Sedol still doesn't give in. He goes for the kill at 210.
 |
| White could have chosen to let black live by playing this way. Now black has around 100 points on the board, while white has around 65 excluding the bottom moyo. This means that White just needs 30 points in the bottom moyo in order to win, which doesn't seem very difficult. So why didn't Lee Sedol choose this? 1 word: Kisei. "If I could win by killing the group, why should I let it live?" |
 |
| 216, 222, 228 = 234 217 = A 219, 225, 231 = B 226 = C 232 = D |
 |
| White should have answered at 236. Even if black plays at B later, white can still play at C and nothing will happen. Most importantly, because white didn't play at A, white's left side group has one more liberty, hence the ko is less of a burden for white. |

Probably Lee Sedol already saw this exchange coming when he played at 236, just that he couldn't tell whether it's good or bad. It's impossible to read out all the variations and judge them when you are in the last byo-yomi. The fact is, after this exchange, black is leading by so much it's hard for black to lose now. This is because white's left side stones are all dead, but black could still play at 243 to make white play moves in his own territory to eat the black stones. that's a huge difference. The situation is quite desperate for white after this exchange.

Black gave in a little bit on the bottom, but black's lead still has not changed. White needs to do something on the bottom, so white played at 266. Black played at 267 to exploit white's aji. And white a super strong move at 268. This was white's last attempt to win the game.
 |
| 270 = C If black answers at 269, white will play this way and now there are two cuts at A and B. Things will get complicated for black. |

Black 269 was a good move. Even though white gets territory on the bottom, black also gains the corner and the game would still be good for black.
After that white was desperately trying to create trouble by making use of the dead stones on the left, but black answered everything correctly and nothing serious happened. White 290 was really the last attempt, and black also didn't hesitate playing the strongest move at 291.
 |
| Note that black cannot connect here. Due to the exchanges on the left side white can play at 292 to eat the 3 black stones. Now A and B is miai for white, and white succeeded in turning the game around. |

Black 295 is a good move to make use of the aji in the corner. When black played at 297 white has no choice but to play at 298 to prevent black from living. When black played at 303, white resigned.
 |
| 308 = A If white continues, black would connect at 305, and even though there's damezumari, black would still win by 1 liberty. |

Is this the end of Crazy Stone Era? Most likely, yes. He is still one the strongest, but sadly to say probably the time for him to shine is over. Just like how he ended the Stone Buddha Era.
This actually brings another problem. There is news that Lee Sedol will be having Ten Match Series with Gu Li soon this year. After his defeat in the recent two championships, people may start to question, is Lee Sedol still the world No. 1? Would the event still be worth organising?
On the other hand, Kim Jisuk is definitely happy with his new found champion. In the interview he said that the all 3 games were very difficult and he only could win because of luck. He said maybe he played better because Lee Sedol had always been a senior he admired and hence he could play the game with a more relaxed mind. No matter what the reason is, we all witnessed Kim Jisuk's strong fighting skills that are no weaker than Lee Sedol's. Lee Sedol had almost no chance in the first 2 games, and even in the 3rd game Kim Jisuk managed to turn back the game under unfavourable conditions.
I will of course still be looking forward to Lee Sedol's games. But from now on, Kim Jisuk will be another star worth looking forward to.
Kim Jisuk's Interview:
http://www.cyberoro.com/news/news_view.oro?div_no=A1&num=517837&pageNo=1&cmt_n=0
Full Kifu:
Black: Kim Jisuk 9p
White: Lee Sedol 9p
Black won by resign
(;EV[µ⁄18ΩÏ∫´π˙GSº”µ¬ ø±≠戻¸ŒÂ∑¨∆µ⁄»˝æ÷]DT[2013-04-22]PC[]SZ[19]KM[6.5]US[∆ •µ¿≥°]SO[http://weiqi.tom.com]C[http://weiqi.tom.com
∆ •µ¿≥°-->æ´≤ ±æ÷
18:00Ω¯––,√ø∑Ω10∑÷÷”,3¥Œ40√Î∂¡√Î.π⁄æ¸7000ÕÚ,—«æ¸1500ÕÚ∫´‘™]RE[B+R]PB[Ω÷æŒ˝]BR[∞À∂Œ]PW[¿Ó ¿ Ø]WR[æ≈∂Œ];B[pd];W[dd];B[qp];W[dq];B[oq];W[qf];B[nc];W[rd];B[fc];W[cf]
;B[qh];W[qc];B[qe];W[re];B[pf];W[pg];B[qg];W[rf];B[og];W[jp]
;B[pj];W[co];B[fe];W[di];B[eg];W[dh];B[hi];W[jd];B[jf];W[hc]
;B[kc];W[jc];B[kb]
;W[hf]LB[jf:29][hc:30][jc:32][kc:31][kb:33]L[mc]TR[fc][fe][eg][hi];B[de];W[ce];B[dc];W[ed];B[fd];W[cc]
;B[gg]LB[de:35][ce:36][dc:37][cc:40][ed:38][fd:39]L[he];W[hg];B[hh];W[jg];B[kg];W[gf];B[ff];W[gh];B[fg];W[jh];B[kh]
(;W[kf];B[ke];W[ji];B[je];W[ie]
;B[hd]LB[gf:46][ff:47][fg:49][hg:42][gh:48][hh:43][jg:44][kg:45][jh:50]
[kh:51][ji:54][kf:52][ke:53][je:55][ie:56]
(;W[id];B[ig];W[if];B[ih];W[gb];B[fb];W[ib];B[jb];W[kd];B[le]
;W[ld];B[mc];W[md]
;B[mf]LB[id:58][ig:59][if:60][ih:61][gb:62][fb:63][ib:64][jb:65][kd:66]
[le:67][ld:68][mc:69][md:70];W[gd];B[ge];W[he];B[gc];W[ha];B[hd];W[nd];B[pc]
;W[gi]LB[ge:73][he:74][gc:75][ha:76][hd:77][nd:78][pc:79]L[gd];B[hj];W[gd];B[fa];W[ga];B[hd];W[of];B[pe];W[gd];B[gj]
(;W[fi]LB[hj:81][gd:88][fa:83][ga:84][of:86][pe:87][gj:89]L[hd];B[hd];W[ng];B[oe];W[gd];B[cb];W[ec];B[hd];W[nf];B[ne];W[gd]
;B[bc];W[db];B[hd];W[ob];B[oc];W[gd];B[bd];W[bb];B[hd];W[me]
;B[lf];W[gd];B[cd]
(;W[hd]LB[gd:112][cb:95][nf:98][ne:99][ec:96][bc:101][db:102][ob:104]
[oc:105][ng:92][oe:93][bd:107][bb:108][me:110][lf:111][cd:113];B[dc];W[mg];B[ki];W[jj];B[kj];W[jk];B[kk];W[jl];B[kl];W[jm]
(;B[pb]LB[dc:115][mg:116][ki:117][jj:118][kj:119][jk:120][kk:121][jl:122]
[kl:123][jm:124];W[cc];B[eb];W[ca];B[ee];W[dc];B[da];W[ea];B[cg]
(;W[bg];B[da]
;W[oh]LB[cg:133][bg:134][da:135][cc:126][ca:128][eb:127][ee:129][dc:130]L[ea];B[cb];W[oj];B[ok];W[nk];B[oi];W[nj];B[ni];W[pi];B[qi];W[mi]
;B[ph];W[nh];B[pi];W[ml];B[lm];W[ol];B[pk]
(;W[mj];B[mn];W[lg];B[kf];W[nn];B[no];W[on]
;B[pm]LB[cb:137][oj:138][ok:139][nk:140][oi:141][nj:142][ni:143][pi:149]
[ph:147][qi:145][mi:146][nh:148][ml:150][lm:151][ol:152][pk:153]
[mj:154][mn:155][lg:156][kf:157][nn:158][no:159][on:160];W[qm];B[pl];W[pn];B[om];W[nm];B[pp];W[rl];B[ro];W[rn];B[rj]
;W[rk]
;B[rb]LB[pn:164][pm:161][qm:162][pl:163][om:165][nm:166][pp:167][rl:168]
[ro:169][rn:170][rj:171][rk:172]L[mo];W[rg];B[rh];W[si];B[sh]
(;W[qk];B[og];W[qo];B[rp];W[pg]
(;B[po]
;W[og]LB[rg:174][rh:175][si:176][sh:177][qk:178][qo:180][rp:181][po:183]
[pg:182];B[qn];W[nl];B[sn];W[qo];B[mh];W[lh];B[qn]
(;W[km];B[rm];W[ll]
;B[dk]L[qo][mh]LB[qn:191][nl:186][sn:187][lh:190][km:192][rm:193][ll:194];W[fk];B[cn];W[bn];B[bm];W[dn];B[cm];W[bo];B[bi];W[bh];B[fj]
;W[ej];B[ek];W[fl];B[bk]
(;W[ci]LB[dk:195][fk:196][cn:197][bn:198][bm:199][dn:200][cm:201][bo:202]
[bi:203][bh:204][fj:205][ej:206][ek:207][fl:208][bk:209];B[en];W[em];B[cj];W[ai];B[aj];W[bj];B[ei];W[eh];B[bi];W[qb]
;B[qa];W[bj];B[do];W[dm];B[bi];W[ra];B[sa];W[bj];B[fm];W[el]
;B[bi];W[pa];B[oa];W[bj];B[eo]
(;W[dj]L[ei][bi][ra][pa]LB[en:211][em:212][cj:213][ai:214][aj:215][bj:234][eh:218][qb:220]
[qa:221][do:223][dm:224][sa:227][fm:229][el:230][oa:233][eo:235];B[bi];W[sm];B[ah];W[rn];B[gm];W[so]
;B[rc]LB[dj:236][bi:237][sm:238][ah:239][rn:240][gm:241][so:242];W[qj];B[qd];W[ql];B[fp];W[dp];B[fr];W[mp];B[mr];W[lr];B[sd]
;W[sg];B[se];W[ri];B[mq];W[lq];B[ja];W[ia];B[mo];W[np];B[oo]
;W[ms];B[or];W[hr]
;B[bq]LB[hr:266];W[fq]LB[hr:266][bq:267]
(;B[cp];W[dg];B[fh];W[be];B[af];W[ag];B[ae];W[ai];B[bj];W[ep]
;B[fo];W[am];B[cl];W[gp];B[gq];W[eq];B[go];W[dl];B[ck];W[al]
;B[gl];W[cq]
(;B[gr]LB[cp:269][dg:270][fh:271][be:272][af:273][ag:274][ae:275][ai:276]
[bj:277][ep:278][fo:279][am:280][cl:281][gp:282][gq:283][eq:284]
[go:285][dl:286][ck:287][al:288][gl:289][cq:290];W[hp];B[hq];W[iq];B[cr];W[bp];B[er];W[dr];B[ds];W[cp];B[ir]
;W[hs]
;B[es]C[Ω÷æŒ˝¡„∑‚¿Ó ¿ Ø∂·µ√∏ˆ»Àµ⁄2π⁄]LB[gr:291][hp:292][hq:293][iq:294][cr:295][bp:296][er:297][dr:298]
[ds:299][cp:300][ir:301][hs:302];W[gs];B[br];W[jr];B[aq];W[cs];B[bs];W[an]
;B[ap]L[cs]LB[es:303][gs:304][br:305][jr:306][aq:307][bs:309][an:310])
(;B[bp]
;W[br]LB[bp:291]TR[am][al]L[hp][gr]))
(;B[gq];W[fn];B[gn];W[go];B[fo]
;W[eq]L[gr][gp][fn]LB[gq:269][fq:268][gn:271][go:272][fo:273]))
(;W[dp]
;B[bi]LB[dp:236]L[dj][gm][fn]))
(;W[dm];B[ci];W[ch];B[dj];W[ei]
;B[dl]LB[dm:210][ci:211][ch:212][dj:213][ei:214]))
(;W[rm];B[li];W[mh];B[qo];W[qj];B[sk];W[sl];B[ri];W[sj];B[sk]
;W[sj];B[so];W[sg]
;B[sm]L[sk]LB[rm:192][qo:195][li:193][mh:194][qj:196][sl:198][ri:199][sj:202]
[so:203][sg:204]))
(;B[rc];W[og];B[qd];W[qj];B[sd];W[ql];B[se];W[sj]
;B[sf]LB[rc:183][og:184][qd:185][qj:186][sd:187][ql:188][se:189][sj:190];W[ri];B[sg]))
(;W[sk]
(;B[sm];W[og];B[rc];W[sj];B[sd];W[ri];B[qd];W[qj];B[se];W[qk]
;B[sf];W[ll];B[km]
;W[lk]LB[sk:178][sm:179][og:180][rc:181][sj:182][sd:183][ri:184][qd:185]
[qj:186][se:187][qk:188][sf:189][ll:190][km:191])
(;B[og]
;W[sm]LB[sk:178][og:179])))
(;W[nn];B[mj];W[lj];B[li];W[mk]
;B[lg]LB[li:157][lj:156][nn:154][mk:158]L[mj]))
(;W[dg]
;B[da]L[bg]LB[dg:134]))
(;B[ee]
;W[pb]L[oh]LB[ee:125]))
(;W[ca]
;B[hd]L[cg][eb]LB[ca:114]))
(;W[eh]
;B[hd]LB[eh:90]L[fj][fh][gd]))
(;W[he];B[ig];W[if]
;B[ih]LB[he:58][ig:59][if:60]L[id]))
(;W[ji]
;B[ie]LB[ji:52]))
0 comments:
Post a Comment